 Organic Workflow
 Peptide Workflow
 Scale-Up Flash Purification
  Sample Preparation
 Biomolecule Purification
 Oligo synthesis
 Scavengers and Reagents
 Service & Support
 Accessories & Spare parts
 Investors
 Reports & News
 The Share
 Corporate Governance
 Calendar
 Sustainability
 Our Offering
 Our History
 Our Locations
 Leadership
“I love doing maintenance. It’s the best part of my week” – said nobody ever. Let’s be honest. We all dread performing maintenance. Why? It’s boring. I’m a chemist and I’d rather spend my time using my instrument than maintaining it. It seems unnecessary. I’m a fan of what I call “sensory maintenance” – that water looks pretty clean, that pump sounds pretty good.
I don’t always know what I should be doing for preventative maintenance.
We all dread preventative maintenance, but all of our instruments require it – including our evaporators – and it’s necessary to prevent awful and dreadful scenarios from happening – like losing an entire day’s worth of testing because your extracts got contaminated! In that scenario, you lose a day of testing because your samples have been contaminated and you lose another day to do the maintenance you avoided doing in the first place! Your downtime has just doubled! Personally, I’d rather put my lab work on hold for one day rather than lose two, fixing the problem I’ve created.
Preventative maintenance is probably one of the most important tasks to be done in a laboratory, particularly when that laboratory is full of instruments that require proper maintenance from time to time. After all, we’re very fond of our instruments and we want them helping us produce our best data each and every day.
For example, if you have a water bath concentrator that you use on a daily basis, there are several routine maintenance tasks that can be done to help keep your water bath concentrator clean and working properly. Here are 4 preventative maintenance tips to help you keep your concentrator running in tip-top shape:
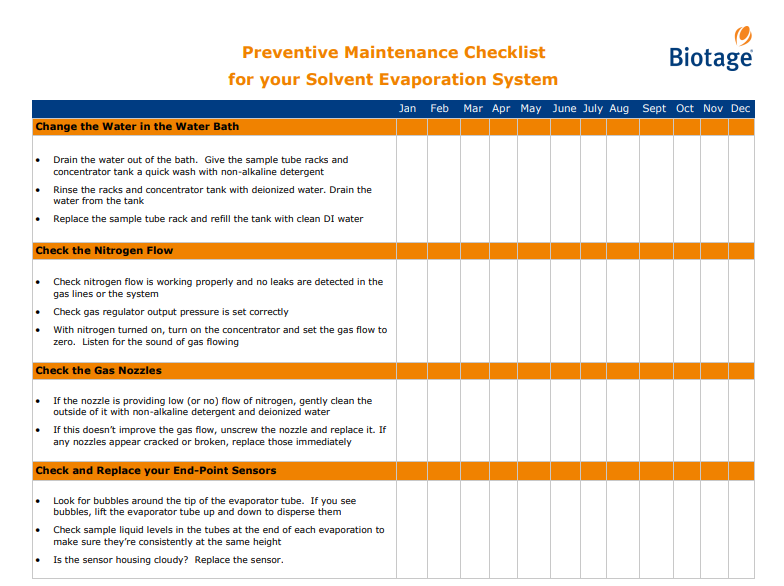
1. Change the Water
Change the water in your water bath. Change it often. Pay attention to whether anything falls into the water and change it if that happens. Believe it or not, the water bath’s biggest enemy is sometimes our samples. We’ve all been there. We’re as careful as we can be and we do everything we can to prevent it, but sometimes our samples splash, contaminating the water bath. Not only does this cause some inhomogeneity in the water bath (which causes small differences in the temperature over the entire bath), but the solvent in the water bath could evaporate, condense on the inside lid of the evaporator, and drop into your samples.
When you’re ready to change the water in your bath, follow these steps (it’s quicker and easier than you might think):
- -Drain the water out of the bath. Some concentrators have a drain to make this easier. Otherwise, you might have to tip the concentrator to pour the water out the same way it’s put in.
- -Give the sample tube racks and the concentrator tank a quick rinse with a non-alkaline detergent.
- -Rinse the racks and concentrator tank with deionized water. Drain the water from the tank.
- -Replace the sample tube rack and refill the tank with clean deionized water. Fill the tank to the level just above where the liquid level of your samples will sit when you load evaporator tubes into the unit with real samples.
NOTE: some labs use algaecides to reduce the formation of algae in the water. Use these with caution as algaecide compounds are included in target analyte lists for some labs. The algaecides in the water bath could contaminate your samples during evaporation, producing high recoveries for some of your target analytes. If you note any algae growth in your concentrator, change the water in the bath more often.
2. Check the nitrogen flow
Check to make sure that the nitrogen flowing through the concentrator is working properly and that there are no leaks in the gas lines or the system. Ideally, you should do a quick check each time you use the concentrator, but you should check it a minimum of once a week. Check your gas regulator to make sure that the output pressure from the nitrogen tank is set correctly, based on the manufacturer’s recommendations for your concentrator. With the nitrogen turned on, turn on the concentrator and set the gas flow to zero. Then bend close to your instrument and listen for the sound of gas flowing. Hopefully you won’t have any leaks in your gas lines so you won’t hear anything. If you do, locate the gas line from the tank to the concentrator and tighten all the connections. If you can still hear the sound of gas flowing, replace the gas line and double-check all the connections.
3. Check the gas nozzles
Once you’ve made sure that nitrogen is flowing into the concentrator at the correct rate, you need to check the gas nozzles. The nozzles direct nitrogen into the sample tubes during evaporation. The direction and flow rate of the gas is critical to making sure the nitrogen evaporates your solvent properly, so these should be checked each time you use the instrument. If the nozzle is providing a low (or no) flow of nitrogen, gently clean the outside of it with a non-alkaline detergent and deionized water. If this doesn’t improve the flow of gas, unscrew the nozzle and replace it. If any of the nozzles ever appear cracked or broken, replace those immediately.
4. Check and replace your end-point sensors
If your concentrator uses end-point sensors, their function should be checked periodically. Keep in mind that these are small electronics operating in a heated (and sometimes contaminated) water bath, so they require a little tender loving care sometimes. Small bubbles can develop around the tip of the evaporator tube which can prevent the sensor from working properly. If this is the case, you can gently lift the evaporator tube up and down to disturb the bubbles and to get them to move away from the tip. The sensor housing might also become cloudy if an organic solvent such as methylene chloride has splashed into the water bath. If this is the case, the sensor will likely just need to be replaced. And don’t forget that the sensors are operating in a harsh environment so check in on them often and replace them if they stop working.
Most instruments require some level of preventative maintenance and it’s an important step to make sure your instrument performs well, and to prevent failures that cost you both time and samples. Download our helpful preventative maintenance checklist for solvent evaporation systems.
If you ever want to delay or skip your preventative maintenance, just remember it could cause you to lose more than just one day of testing. Preventative maintenance is supposed to prevent bad things from happening to samples, so don’t skip it!
Biotage hosted a live demonstration on the next generation TurboVap Evaporation system, click the link below to watch it now.