 Organic Workflow
 Peptide Workflow
 Scale-Up Flash Purification
  Sample Preparation
 Biomolecule Purification
 Oligo synthesis
 Scavengers and Reagents
 Service & Support
 Accessories & Spare parts
 Investors
 Reports & News
 The Share
 Corporate Governance
 Calendar
 Sustainability
 Our Offering
 Our History
 Our Locations
 Leadership
Welcome to part 4 of our blog series “The Problem of PFAS”.
If you are just tuning in, you might want to take a look at the previous blogs of this series as we provided background on the PFAS controversy (Part 1), a review of the regulatory guidelines for monitoring PFAS contamination in the environment (Part 2), and most recently, a look at which analytical method might work the best for your lab (Part 3). If you are up to speed on this series, you should now have a good baseline on what we’ll be discussing today.
It’s always frustrating to analyze a batch of data only to find that your control blanks are riddled with contamination causing you to track down the source before you can re-analyze your samples. As we have previously learned, PFAS compounds do not readily break down and can persist in the environment over long periods of time. In the lab, this can lead to some persistent contamination that can be observed throughout the PFAS workflow. It can seem like a tall task to pinpoint that contamination since there are a variety of different points where contamination can be introduced to the sample. The most successful way that I have found throughout my years in the lab has been working backwards.
Last things first, the analysis of sample extracts. All PFAS methodology discussed in this blog series utilize a LC-MS-MS for analysis and it’s the first location that I would look at to track down contamination. A quick and easy way to determine if the LC is the source of contamination is running an instrument blank consisting only of solvent and any necessary characterization standards such as isotope dilution or performance standards used in EPA method 533 and 537.1. If any contamination is found in that blank, then the instrument itself could be carrying contamination . A good way to check this is by running a zero-volume injection and check for contamination peaks in the appropriate windows. If the instrument is found not to be the source, then the standards or solvents could be introducing the contamination. Some key things to scrutinize here would be the mobile phase reagents and washing solutions. If that instrument blank is otherwise free of contamination, now it is time to move further down the line.
Since analysis is the last thing to occur in the PFAS workflow, the thing that happens just before analysis is human interaction when the LC vial is placed on to LC-MS-MS. With that said, the next thing you should focus on is taking the human aspect of contamination out of the equation. This means wearing the proper lab gloves when working with PFAS samples so any potential contamination from your hands does not come in contact with the samples. Powderless Nitrile gloves are typically what is recommended for PFAS testing; however, latex gloves can be used but should be tested for PFAS first.
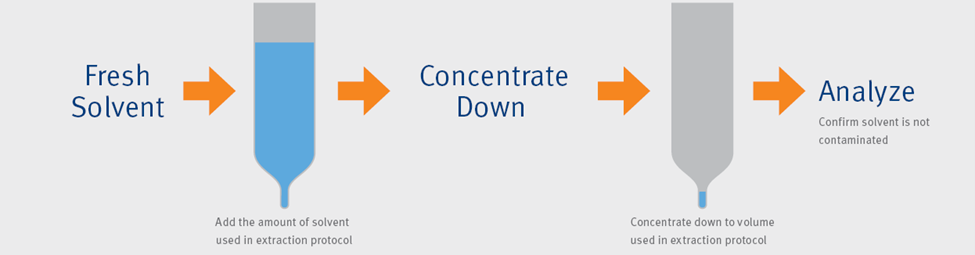
The next few points of introduction include extract concentration and vialing. The biggest thing is to be sure that all vials, caps, pipettes, and collection vessels are approved for use with PFAS. A good rule of thumb would be to ensure that all supplies that will be used for PFAS extraction and analysis are completely independent and only used for PFAS, that way you can be sure that there is no stray contamination from another type of analysis. These parts should be routinely analyzed to demonstrate that they are free of contaminants. To help test the cleanliness of these components, it is a good idea to prepare a solvent blank that is concentrated alongside any extracted samples that is different from the instrument blank that I discussed earlier. A more detailed outline can be seen in our application note detailing the above process.
Finally, we come to the sample collection and extraction themselves. Whatever is used for the extraction, whether it be a manual manifold or an automated extractor, it must be outfitted with components approved for PFAS. This includes anything that will come in direct contact with the sample itself. Per method requirements, control blanks must be extracted with every batch of samples and it is recommended to keep a log of historical blank data to see if there are any trends. As with most other extractions, stay diligent when cleaning your equipment to ensure that an automated system is flushed routinely, or any components are rinsed and dried separately from any other labware that might contaminate it. Our application note for the EPA method 537.1 includes a detailed outline on the cleaning procedure that gave us consistent success in maintaining a PFAS-free workflow (download below).
As mentioned previously, PFAS contamination can come from a variety of sources. Therefore, you must make sure samples are not exposed to potential contamination from the time it is collected to the time it arrives to the lab. That is why it is extremely important that the sample is collected in the field by qualified field personnel using sample collection vessels that are approved for use with PFAS. If you’ve exhausted your options, make sure that those bottles are clean from the start by analyzing a solvent rinse of a brand-new bottle.
With PFAS being a such a new analysis, it is important to rely on the good practices you’ve already used in the lab. Unless you know exactly what might have introduced that contamination, working backwards will always be your best bet to systematically eliminate each of the sources without changing too many variables at once. Hopefully this blog series has helped give you a good understanding of the PFAS workflow and how to handle the many challenges that come with analyzing these resilient compounds!